Nicole Diary Water Decal Review - Pt. 3

*Some of the following items were provided for me to review but as always I will give my full and honest opinion.
Allo polish Pals!
How are you all doing today? I hope you are having a great week so far. It feels like it is just flying by and as I had feared its passing before I am getting time to do everything...phew. Have you been busy or chilled so far this week? By the way, would you guys like a water decal tutorial? Or do you all think its pretty well addressed by now and that most people know how to use them?

Today I have two more sets of water decals to show you from Nicole Diary (By the way, they are also on Instagram and sometimes host giveaways) Again I have two entirely different sets and I like them both a lot!
Psst! Nicole Diary has kindly offered you guys a free gift worth upto $5 when you order from their Alliexpress/Amazon store and add the code: 'ITH2016' in your order note!
Our first set today is 'Nicole Diary-02' these stunning tropical looking water decals with peachy pink flowers and beautiful green palm (?) leaves. I personally feel like they scream Come on, summer! I would love these as accents for a beautiful vacation abroad. They contain a solid white background which means you can pretty much just go on and apply but I applied some NYC 'Williamsburg Vintage' white polish out habit..or compulsion, not sure which! I decided to pair them with a gradient using my white and Catrice's 'A Gallon Of Melon'. I added a very, very, almost not there ruffian with green acrylic just to tie it all together. I also added Catrice's 'Matte & More' which gave it a really nice but subtle shimmer – perfect in the sun!
 
Our second set today is  'Woman and Roses' (Nicole Diary-11) I am amazed with these!! These water decals do have a solid white background so I didn't need to fuss about what I would pair with it or put underneath. I love the anime style looking woman, she looks so elegant and mysterious! These are probably the rose decals I have liked the best out of the ones I have tried. There's something sort of... 'tattoo' like about them that I think makes them look cool. Yeah, I said cool!!..
On my ring finger accent nail I decided to pair these with Essie's 'Leading Lady' and a simple heart stud (regret, regret.)

I really love both of these decals, they are so entirely different that I can't really pick a favorite but I'll say... The first ones for the summer/vacation! Second for moody broody red manicures. Again, both of these are a dream to apply and any excess literally disappears at the touch of my remover brush so clean up is also really, really speedy!

Which of these water decal patterns do you like best? Are you a fan of decals on all nails or mixing and matching with accent nails?

Have a beautiful day my friends, I'll be back on Friday for something quite exciting (hopefully!)
Love
Ithi
SHARE:

Nicole Diary Water Decal Review - Pt. 2

*This post contains an item(s) that was provided for reviewing purposes however I will as always give my full and honest opinion. 
Allo polish Pals!
How are you all doing today? I hope you are having a great week so far. I have been exploring Holland on Doris, I managed to get to the first subway station after the one at the mini mall! Its so weird riding on the opposite side of the road so I am sticking to the bicycle paths, the real road scared me a little, ha!

Today I have two more water decals to share with you from Nicole Diary. In case you missed my first review you can see it *Here*. So far its been nothing but a lovely experience, I am really enjoying how unique these water decals are and the ease of application.

I'd also like to mention that Nicole Diary have very kindly offered readers of IthinityBeauty a free gift worth up to $5 when you order from their Amazon/Aliexpress store and add the code 'ITH2016' to your order note - Isn't that super nice of them?!

This first design can be found: Here.

This first design is a beautiful combination of full pattern and sheer areas (in between the pattern) for this reason I decided to pair it with a beautiful silver holographic glitter underneath. Can you see the sparkle popping through the pattern and even under the decal colours? The colours on this decal are green, red and black and work beautifully together. I kind of get a Native American/Dream weaver feeling from them, don't you? I could be wrong. This manicure got me so many compliments!


This design can be found: Here.

The next set of decals are much more simpler if heavy patterns are not your thing. I think there's something really soft an feminine about this doodled/silhouette pattern. I feel like it would be well suited to some kind of soft furnishing! To keep the elegant and feminine look I decided to keep this manicure very light. I created a gradient using Rimmel's 'Breakfast In Bed' and Essence's 'A Girl With A Pearl' with a single accent of Essie's 'Beyond Cozy'. I finished by adding my decals and a single light green stud (Should have gone more pastel) and applied my Pro-FX topcoat.

I absolutely love both designs. You guys know me, I'm not shy of a full patterned nail! I also like that I can sneak glitters underneath for a little sparkle-pop! I think they would both be great for different occasions or as accent nails if you like a simpler but still super pretty manicure. I'm eyeing up the first one for big toe nail accents!

What do you think of these designs – which one do you prefer? Would you like to see how I apply my water decals in a video tutorial?

Have a beautiful day my friends, I'll catch you on Saturday!
Love
Ithi
SHARE:

Freehand Marie From The Aristocats

Allo polish Pals!

How are you doing today, my friend? How is your week so far?
It looks like I'm going to have a much busier week than usual - yay! Tomorrow I will be going to help out at a family members house, it also means I get some extra time with my Dutch nephews who are just the sweetest little boys ever.

Let me ask you a question, what is your favorite Disney animal character?

I don't think I could just pick one, there are so many cute ones! I think they make great ideas for manicures, there are so many characters I want to do from Disney but I don't think I actually have the skillset to paint them all that well - I still don't know how I did the two skunks as I did...I think that was a fluke. I can certainly try though, right?

Today I have Marie from The Aristocats because I thought with her pretty pink bows I could create a very girly and pink themed manicure. I really don't think I did a good job painting her, I think she's incredibly cross eyed and stoopify looking. Maybe its more her right eye that makes it look messed up to me. A try is a try, though!


For this manicure I started with my beloved OPI 'Nail Envy base coat and once dry applied two coats of Hema's 'Happy Pink' which is a super fun looking glitter. I then used my acrylic paints to freehand Marie to the best of my abilities, I add a few paws and 'shine' marks on my remaining nails. I finished it all off with my Pro-FX top coat and then proceeded the mandatory 'what do this look like matte' experiment.

So what do you think?

Do you think it looks like Marie? Have you had Disney inspired nails before?

Have a beautiful day, Catch you on Thursday!
Love
Ithi
SHARE:

Freehand Luna Wolf Pup With DIY Dry Marble Decals

Allo polish Pals!

How are you doing? Are you looking forward to the weekend? Gosh don't these weeks go fast? That's one thing I miss, really. When you don't work sometimes the week and weekend all just seem the same, I miss getting excited for the weekend, haha.

Today I have a manicure that was actually started over three times. I am still not happy with the finished result as I didn't slope the wolf's back enough...so it looks like he just has a really thin neck.
Mr Bravo tells me it looks more like a pup.


For the background I created some DIY dry marble decals using Kiko's 'Colbalt Bue', Barry M's 'Blackberry' and 'VIP' glitter and 'Supersonic' and TipTop Polishes 'Jazzberry'. I let the decals dry over night and applied them on top of my base coat the next day. I cleaned up any excess with my remover brush and Essence nail polish remover. I then took my acrylics and freehanded the wolfy.

Despite not being happy with the final wolf... I do like the background paired with the silver and stars.. Mystical looking! I think I should have 'sloped' off his back a little more, I wanted it to look like he is sitting but I think instead he just looks like he has a really long neck!

What do you think of this manicure? Do you often feel like starting a nail design over?
Have a lovely day, I'll see you on Sunday!
Love
Ithi

SHARE:

The Lonely Sail Boat

Allo polish Pals!

How you doin'? I hope you are having a good weekend is going well as and when you read this :)
I'm so out of...everything! Normally all my posts are done two weeks or so in advance, written, pictures edited but being ill completely threw me. I'm sorry that today's post is not ground breaking, I am working hard on posts and freehand designs. I've just been in a slump!

Today I have a really simple manicure to show you, this one was inspired by *this* pin on Pinterest. I just thought there was something cute about that lone paper boat... Sadly I did this before my Pro-FX top coat arrived... that super shine would have looked awesome with this manicure!


For this manicure I began this manicure by painting two coats of Barry M's 'Black' and added Paris Memories 225 on top which is a black gelly with silver glitter – cute for stars I was thinkin'! Next I began using my acrylics to paint the sea, stars, and the boat. I finished it all off with my Catrice top coat (I have come to hate this stuff, it has destroyed too many manicures and dies before half way of the bottle!!) I also added a little of Hema's 'Green Circus' to the waves for a little sparkle!

What do you think of my peaceful starry night nails? Have you had sea nails before?

Have a lovely day!
Love
Ithi

SHARE:

Greyscale peacock

Hi everyone!
How are you all doing today? Today I have another manicure which was created TWICE. Twice! And I still didn't like the outcome!  (That's nothing... what is on my nails right now is the 4th attempt...What's wrong with me?!) Basically, I did my peacock lady just too dark, so her sparkly little head thingy-plumes didn't glisten and sparkle as I had hoped – same happened with the eye....*Total face palm in the most dramatic way*

I'm having terrible nail luck lately. Hopefully by the time I post this it has improved. I sure hope so because I find it so disheartening to keep creating things that don't make me happy or satisfied.

For this manicure I began my usual base coat of OPI's 'Nail Envy' and followed on with two coats of Barry M's 'White'. Next I created my peacock and feathers using only black and white acrylic paints and filled in certain parts with nail polishes. For the feathers I used a mixture of Hema's 'Green circus', Pretty Serious's 'Crystal lake' glitter and Model's Own 'Gold Rush'.

Its not.. really what I wanted. I hate it when that happens. Maybe you guys like it better than I do? I can only hope!

What do you think of my peacock feathers? Have you had peacock nails before?
Have a wonderful day!
Love
Ithi
SHARE:

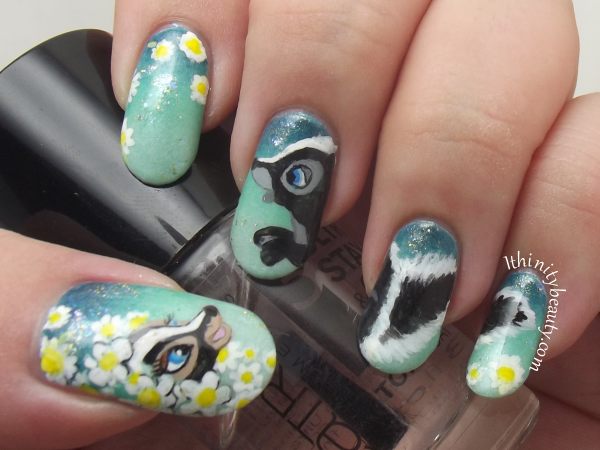
Flower Falls Inlove - Freehand Disney Nail Art

Allo polish Pals!
How are you doing today? I hope you've had a lovely weekend – what did you get up to?
I have to ask you... do you remember the scene from Bambi (I cry so bad at Disney films!) where Bambi, Thumper and Flower find their mates? I have a clip below to refresh your mind if you can't.

Really wanted to catch the cuteness of when Flower meets his... girlfriend? She's peeking out through the flowers at him and he is enchanted by her. Well.. lets turn that into nail art!

For this manicure I began with my regular base coat of OPI's 'Nail Envy' and applied two coats of Barry M's 'Meadow' from the silk collection. Next I created a gradient using piCture pOlish's 'pshiiit ' and 'Jade'. I created the rest with my acrylic paints and bamboo brush. I sponged on a little of Hema's 'Green Circus' glitter topper and finished by adding two coats of Catrice's gel effect top coat to smooth everything out.

I'm pretty happy with how I did this nail art - I wish I had done a slightly more careful job with the flowers, but it turned out better than I first expected even if I did have to start the females face over!

What do you think of my flowery Flower nails? Would you want me to try other Disney characters?
Have a lovely day!
Love
Ithi
SHARE:

Freehand Serenading Frog Nail Art

Allo polish Pals!
How are you doing today? I hope you are better than me, I seem to have a terrible cold which is not what I need for travelling on Saturday! Today I have another of those hated manicures, I was so so sure I wouldn't post this, I had such a hard time with the frog. I saw my pictures and I still wasn't sure about posting it. I left it a while and looked at the pictures again and figured it maybe wasn't so bad as I first thought.. so here it is then. HERE is my inspiration picture, you'll see how entirely far off mine looks, the inspiration duck is way cuter and the frogs violin turned into a guitar due to lack of space! 


For this manicure I began with NYC's 'Statue Of Liberty' and created a gradient using China Glaze's 'Smoke N' Ashes' and Barry M's 'Cardamom'. Once this was dry I added Hema's 'Green Circus' glitter topper. I then freehanded everything else with my 'Docrafts' and Oumaxi acrylic paints.

I'm not entirely sure I'm happy with this manicure yet, but I guess it could be worse? Much much worse? I'll let you guys decide.

What do you think of my serenading frog? Have you had frog or duck nails before?
Have a great day,
Love
Ithi
SHARE:

Freehand Ocean Mosaics

Allo polish Pals!
How are you doing today? I hope you are having a good Monday, are you being productive? Today calls for a little stop at the Mini mall, house cleaning and hopefully some nails. More importantly I need a lot of pc time for emails and editing things.
I don't wanna say too much about this manicure but this is what I meant before, about being so inconsistant. You look, you see, you make your own minds up. That proves to be wiser than me writing something off and never sharing it with you :)

For this manicure I began with two coats of Barry M's 'Coconut' and began making sectioned off lines with my white acrylic paint. I then proceeded to fill in these spaces using a mixture of acrylic colours and some glitter from Hema's 'Green Circus' and Barry M's 'VIP. I then went back over my lines to get the sections to stand out.

If I hadn't been like a yeti with a paint brush it could have been quite pretty perhaps!? I'm just not fond of the general mess and very unneat lines with this manicure.

Have you done a mosaic type of manicure before? What do you think of my bluey green manicure?

Have a wonderful day!
Love
Ithi
SHARE:

Autism Awareness Month With Support Of TheFinderThings

*This item was sent to me to review but as always will contain my full and honest opinion.

Allo polish Pals
How are you today? I hope your having a better start to the week then I am, weird things are going on again and I woke up with my other eye almost completely swelled shut. I'm really quite a vision of beauty the moment...

Today I am sharing a manicure with you that celebrates a great awareness cause and that has the support of my friends at TheFinderThings. Since I first met TheFinderThings I was instantly impressed that they carry all sorts of awareness and support decals in their store. I love that they are using their knowledge and expertise to make a simple to use decal into something that can help educate others with awareness causes. You know just as well as I do, that for us our nails are often a talking point amongst our friends, family and the nail art community, so even wearing these decals can help spread the word. You can find their full range of support decals right Here. This is quite a long post so please click the 'read more' link below.


SHARE:

Freehand Pudgy Pesky Panda's - I'm Back!

Allo polish Pals!
How are you today? You might have noticed my blog was down for a few days, at least trying to get on with 'ithinitybeauty.com' wasn't a possibility – I'm sorry for the inconvenience some of you may have had. I'm just glad it is all sorted now, I know some people were concerned I was going to quit blogging but I can tell you I have no plans to stop blogging, it was just a technical problem. Now that we've covered that... How about some more cute?!

Mr Bravo insisted I show you this panda from this angle as it looks like he is tumblin' around!


I used four polishes for this manicure. I started three nails with my light green polish, 'Charlie Seen In Green' by Essence and applied two coats of Barry M's 'Cardamom' to my remaining nails. On top of 'Cardamom' I added some dots using Hema's 'Green Chameleon'. I then used my favorite bamboo brush (Haha, how fitting for this manicure) to create my panda cubs and Fogan's #18 for a glitter glimmer to their eyes. On my dotted nails I added a single shoot of bamboo. I finished it all off with my new favorite Catrice top coat.

I hope you like it!
What do you think of my Panda cub nail art? What animal nail art have you created before?
Have a beautiful day!
Love
Ithi

SHARE:

Simple Ruffian With Pretty Colourful Pearl Studs

Allo polish Pals!
Hope you are all having a wonderful weekend so far? Do you have any exciting plans? You may remember a while ago I redeemed some of my Born Pretty Store points and got a few new nail art items? Well today I am going to show you some studs I picked up. I just couldn't resist when I saw these 'Colourful PearlFlat Back Metallic Studs'. Don't forget also, you can get a 10% discount from any orders from the Born Pretty Store when you use the coupon code DRX31

This is a very simple manicure, just your basic ruffian with studs. For two reason's really. The first being that I didn't want to over complicate the manicure with too much and to keep the focus on the studs themselves. I began with two coats of Herôme's 'Kingston' and created a ruffian style manicure using Barry M's 'Huckleberry' and Hema's 'Lilac'. I then added the studs and used regular little studs to accentuate them.

I really adore these studs, I think they have quite an elegant feel to them and I love how they look paired with many colours. The wheel they come in actually has a few other colours, purple, black, blue, white. I picked these up as I thought I would use them in many nail art manicures to come.
They are 4mm in size which I find quite large for some of my nails, mainly my pinkie. But who says you have to wear them on all your nails? :)

What do you think of this very simple manicure? Do you like these gold encased studs?

Have a great weekend!
Love
Ithi
SHARE:

Sparkling Dragonflies

Allo polish Pals,
How are you today? I hope your having a good week. I'm still plagued by tiredness which has made me a lot less productive this week then I would have liked. But hey ho, It'll be fine! I've got a nice cup of green tea and its raining outside – I love feeling nice and snug indoors with this weather.
Today I have some Dragonflies for you, I just love dragonflies...but not this manicure.


On all my nails I started with Barry M's 'Meadow' and created a gradient using Hema's Holographic blue polish. For the dragonflies bodies I used Zoya's 'Indigo' and Color Clubs 'Harp On It' for the wings. Here is where I was perhaps a bit stupid.. I used a grey copic marker pen for a slight outline on the wings when perhaps I should have painted on a grey and dabbed the wings on... Live and learn! I finished up by adding some studs to the dragonflies.


Do you like dragonflies? What do you think of this manicure?

Have a great day, my pretties!
Love
Ithi
SHARE:

Water Decal Transfer Stickers Bird Floral Pattern- The Born Pretty Store Review

*This item was sent to me to review but as always will contain my full and honest opinion :)

Allo polish Pals!
How are you doing today? Are you having a good weekend so far? I'm having a great time in England. (duhh) Yesterday I popped into Boots for the first time in over 7 months and I was so amazed to see that our store now carries Nails Inc, Orly, Mavala, Butter London and more... I was like a kid in a candy shop! I had limited funds but let me tell you, I could have gone crazy! I started today with another productive work out - I'm feeling so alive! Later today I'll be going to watch my three year old niece go swimming and tonight Mr Bravo and I will be going out with my parents for a meal ~ Life is good! Today I have these beautiful Nail art water decals with floral and birdpattern from The Born Pretty Store to show you.
You can get a 10% discount on all items from the Born Pretty Store, Just use the coupon code: DRX31 at the checkout. :)
This gorgeously designed water decal comes on one sheet which measures 7.cm which means there is plenty of pattern for you to play around with. I am simply in love with the design which is incredibly eye catching. The decals have no background colour (Its completely transparent) which means you will need to pair it with a suitable light base colour polish to really show off the design.
I had a real easy time with these decals, application was really easy also.

I started by carefully cutting out two squares of the pattern large enough to fit my nails. I then painted my base coat of Hema polish in Nude, once dry I dunked the patterns under room temperature water for around 30 seconds. Once the pattern was easy to slip off the backing card with tweezers I then lay them onto the nail. The instructions claim you need to finish drying the decals with a hair dryer but I skipped this. I'm such a rebel... They dried onto the nail very fast just like regular decals so I don't think that step is necessary. I finished up by applying my top coat.

For my other nails I applied Hema 'Nude' and created a large ruffian style design with Barry M's 'Meadow' and 'Mist' from the Silk collection. I finished up by applying a few candy studs which are also from The Born PrettyStore. Don't forget you can use my store discount which is displayed to the right.

What do you think of these spring-y flower and bird water decals? Have you tried full nail decals?

Have a beautiful Saturday!
Love
Ithi
SHARE:

Manicure Swap With Natalia of Polished Polyglot

Allo polish Pals!
How are you today? I'm actually writing to your from the future. I'm here in England now but thought I would do this as a scheduled post to keep myself up to date. Do you remember a short while ago I did that really fun manicure swap? I was lucky enough to have the beautiful Natalia of Polished Polyglot email me to ask if I would like to do a manicure swap with her. I of course had to say yes! I've known Natalia's blog right from the first few months of starting my own blog. She's a lovely person, always so warm and friendly. She was so kind to me during my father's heart attack. I've always enjoyed visiting her blog and seeing her newest creations.

I was so excited to take part in recreating one of her many beautiful designs, it was incredibly hard to decide which of her manicures to recreate as she has some really stunning designs. Please go take a look at her website, you wont be disappointed!

Here is Natalia's Design (Left) and my recreation.
I finally managed to decide to recreate Natalia's 'Night Out' nails because I thought they looks so elegant and glamorous. I couldn't help think that she nailed the brief perfectly, I would certainly want to wear these on a fancy night out! For my version I used Hema's nude polish and applied a layer of Collistar's '#37' glitter. I then used striping tapes to add Fearne's 'High Tide' and added a small rhinestone to match Natalia's design.

Natalia decided to recreate my 'Gleaming Oceanic Gradient Nails'. On the left is my version and the right is Natalia's; I love the colours she used and I think her creation is simply gorgeous, I think she made this manicure look so much better than the original!

I think Natalia's manicure is beautiful and looks great wit her nail shape. It's got me wishing for my rounder nails again...

What do you think of this manicure swap? Have you taken part in a mani swap before?

Have a fantastic day!
Love
Ithi

SHARE:
Blogger Template Created by pipdig