Pink, Orange And Teal Waves - Acrylic Gradient

Allo polish Pals!

Welcome to the weekend, my friends!
Do you have any nice plans for this weekend?  I'm looking forward to a really intense workout;
Last week I did great pushing myself and getting back into it - yesterday I didn't get to workout and I really felt like I had missed something. I like the energized feeling!

Today I have one of my weird looking acrylic-gradients (I can't think what else I'd call them) and quite an unusual colour combination once again, although I actually rather like these colours together. It grew on me! Personally it makes me think of deep sea... corals, mermaids...Opps, I'm day dreaming again.


For this manicure I began with my all time beloved OPI's 'Nail envy' (because my nails never thank me more than when they are being cared for with this top coat) I then applied two coats of piCture pOlish's 'Marine'. The rest was really just created with acrylic paints, I should film more things instead of being able to hardly tell you anything! BUT HOW?! I move my fingie's SO much!

My dear friend Andreea said these colours reminded her of Aladdin, does this remind you of anything?

How do you feel about this colour combination? Do you like my acrylic-gradient manicures?

Have a lovely Monday, lets catch up again on Wednesday? :)

Love
Ithi
SHARE:

Shamrock Happy St. Patrick's Day Nail Art - Freehand

Allo polish Pals!

How are you doing today? Happy St. Patrick's day to you all! Will any of you be celebrating today? I personally wont be; I wish I had Irish friends who I could join in with! Either way I love learning about holidays and how people wish to spend them! Of course there will be the abundance of green, rainbowy shamrock filled nail art and manicures all across the blogisphere and the internet, I couldn't help but join in!

Did you know... Apparently St. Patrick is not actually Irish, he was Welsh!

A quick google search also taught me that...

Every year the Irish leader hands a crystal bowl filled with shamrock to the US President. They are originally grown in Kerry and is immediately destroyed by the Secret Service after the exchange.... What the?!! Well, I certainly didn't know that..Did you?!...Is that even true?!


For this manicure I began with two coats of Barry M's 'Cardamon' for a clean base and followed through with two coats of Picture Polishes 'Phshiiit'. I then took my acrylics and began to paint a rainbow with a very fine striping brush. I added a few shamrocks on my nails and outlined them with black (why can't I just leave things alone?!) I finished off with a few gold dots and my Pro-FX top coat.

It didn't come out entirely as I had hoped but it was still fun to do!

Are you rocking any St.Patrick's inspired nails? Will you be doing anything fun to celebrate?

Have a wonderful day!
Love
Ithi
SHARE:

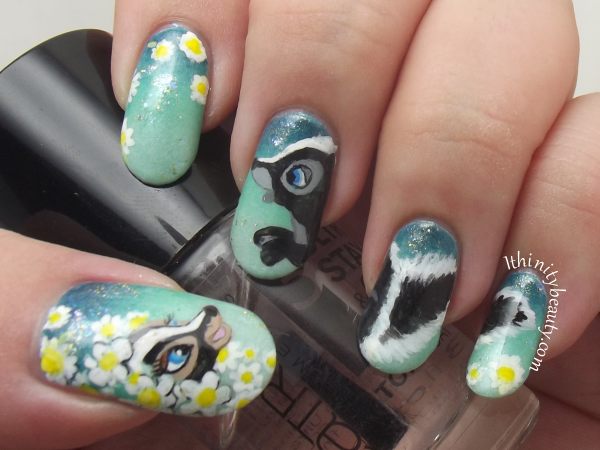
Flower Falls Inlove - Freehand Disney Nail Art

Allo polish Pals!
How are you doing today? I hope you've had a lovely weekend – what did you get up to?
I have to ask you... do you remember the scene from Bambi (I cry so bad at Disney films!) where Bambi, Thumper and Flower find their mates? I have a clip below to refresh your mind if you can't.

Really wanted to catch the cuteness of when Flower meets his... girlfriend? She's peeking out through the flowers at him and he is enchanted by her. Well.. lets turn that into nail art!

For this manicure I began with my regular base coat of OPI's 'Nail Envy' and applied two coats of Barry M's 'Meadow' from the silk collection. Next I created a gradient using piCture pOlish's 'pshiiit ' and 'Jade'. I created the rest with my acrylic paints and bamboo brush. I sponged on a little of Hema's 'Green Circus' glitter topper and finished by adding two coats of Catrice's gel effect top coat to smooth everything out.

I'm pretty happy with how I did this nail art - I wish I had done a slightly more careful job with the flowers, but it turned out better than I first expected even if I did have to start the females face over!

What do you think of my flowery Flower nails? Would you want me to try other Disney characters?
Have a lovely day!
Love
Ithi
SHARE:

Black And White With Striking Dots

Allo polish Pals!
How are you today? Got anything exciting to tell me? Go on, be as random as you like :D

Today I have a manicure which was created before I went to England in September... Its a bit messy, my black acrylic paint was near its death (Thankfully a new one has managed to find its way to me)

I have a confession, actually... I don't remember the coloured polishes I used for this manicure. Argh,
so unlike me not to write everything I used down but eh... Too bad!I certainly don't remember them all after this long!

This manicure began as two coats of Barry M's 'White' which I then added black acrylic on top of in various ways. I then used a dotting tool to create larger and smaller dots with white acrylic paint. (I've come to hate dotting with polish, I hate it when it gets stringy and ruins things) I then used various bright polishes and a dotting tool to fill in a few of the dots.

Its not as neat as I would have liked but I have to admit that in person it was quite striking, I did like how eye catching it was!

What do you think of my slightly different dotticure? Do you like making dotty nail art? 
Have a great day!
Love
Ithi
SHARE:

Freehand Leafy Nail Art With 3D Ladybirds (With Wings!)

Allo polish Pals!
How are you doing today? I think it was around a year ago now that I had an idea to create my own 3D DIY wings... I never actually got around to trying it but the idea had still been stuck in my head. Originally I was going to do it with bumble bees but in the end it turned into ladybirds!

I like how the little one's wings turned out, I wanted them to be transparent instead of solid, somehow the thumb wings came out solid white... huh.

Today I am flying back to Holland. It's been a very odd week with too much crying, laughing, reminising and celebrating the life of my Grandad. Its been an emotional rollercoaster. Now its time to go home and be back with Mr Bravo, things can calm down and I'm going to get back into my routines. I'll be back commenting very soon, I have missed visiting your blogs as much as I had been.

For this manicure I began with two coats of Barry M's 'Meadow and created a gradient with Picture Polishes 'Jade' and Barry M's 'Mustard'. On top of that I added a special effect topcoat from Hema called 'Green Circus'. I then used my oumaxi paints and bamboo brush to freehand the background leaves.

For the wings I used a small piece of baking paper and added some of Essie's 'Sparkle On Top' (I think) on either side. Once dry I used my craft knife to cut small wing shapes. The lady birds were regular studs which I coated with Rimmel's 'Queen of Tarts'. I then used my black acrylic paint to add their dots. Finally, once everything was dry and ready I added a small amount of top coat to the ladybirds to stick the wings on to them.

While it was not entirely what I had hoped for, it was quite time consuming to get to the end result (Especially if you include the time freehanding the leaves.) so I thought I'd share it with you – Next time I will ensure that the leaves are completely sheer!

Have you ever created 3D components for your manicures? How do you think these wings turned out?

Have a beautiful day!
Love
Ithi
SHARE:

Festival Of Colour

Allo polish Pals!
How are you today? I hope you have had a good week so far.
Do you know what one of my favorite nail art style is? Gradients of course! I don't think you can beat a good gradient. THIS is not a good example of 'good' gradients. This manicure was created in my 'eh, meh, bleh' period. None the less, its here! I love this glitter polish from Essence, Mr Bravo and I went to the opening of our local drug store that opened up a few weeks back - it was two small drug stores that got knocked down into one rather fine, fairly large 'kruidvat' which is a big chain here in Holland. When I saw this glitter and I 'oohed and ahhed' he very kindly insisted it was to live in my collection.

Today I have a very bright and 'interesting' manicure to share with you, probably not for those who prefer subtle nail art!


For this manicure I began with two coats of Catrice's 'Honey Blossom' on all my nails. Once dry I began using striping tape to section off triangles on the upper part of my nail and filled it in with Barry M's 'White'. I then used a mixture of rainbow polishes to create gradients on top – using regular tape to stop my colours from going onto the nude polish. I then used Essence's 'Festival Of Colours' on top of the nude polish and finally added a white line to separate the two with white acrylic paint. I finished it all off with Catrice's top coat.

SHARE:

The Little Mermaid Nails - Freehand

♫ I wanna be where the people are
I wanna see, wanna see them dancin'
Walking around on those - what do you call 'em?
Oh - feet! ♪

Inspired by two pins on Pinterest which you can see HERE and HERE.


For this manicure I began by creating a gradient using Picture Polishe's 'Wisteria', Sally Hansen's 'Lilac Heart', I also used a polish from Yes Love and Collection but I am failing right now to think which ones! I then created – or attempted to paint Ariel with acrylic paints. I finally sponged on a little of of Barry M's 'Glitterazi'. I finished it all off by applying my Nail Girls top coat.

I'm actually deeply unhappy with this manicure. There where bubbles and the glitter..doesn't look like glitter at all! Its not...as magical as I wanted it to be. I think more shimmer or sparkle in the sky somehow would have improved this manicure, what do you think?

Have you done mermaid nails before? What do you think of my attempt to paint Ariel?
Have yourself a swimmingly good day!
Love
Ithi
SHARE:

Sugar Skulls With The Finder Things Easy Peel Decals

*This item has been sent to me to review but as always will contain my full and honest opinion.

Allo polish Pals!
How are you today? I'm so sorry I missed a couple of days posting. I have missed you guys! Things here have been a little rough, since my eye has swelled up (its finally beginning to get better – slowly) I've lost all my inspiration and even when I've had it then it was incredibly hard to focus and concentrate. As you can imagine this has left me really frustrated. Anyway I have another post featuring some decals from The Finder Things. These are the awesome 'Sugar Skulls, Day Of The Dead' decals. These decals are just like the Shamrocks I showed you, the method of applying is fast, clean and easy. Just peel and stick! Don't forget to 'read more'.


SHARE:

Delicate Heart Circle 3D Rhinestone's - The Born Pretty Store Review

Allo polish Pals!
How are you today? I hope you've had a good week; Are you doing anything fun this weekend? I'm feeling quite peachy and I'm looking forward to going to the big mall tomorrow with Mr Bravo. Strange thing is, I am looking forward to the long walk there. Nearly every day this week I've been going on walks (and working out) to get fit but not knowing my way around here too well means doing the same route over and over (with some slight exploration)... Tomorrow I'll get to see somewhere else for a change, haha. I have some more beauties to show you today from TheBorn Pretty Store. Again, I am simply in love with these gems! These are 2mm- 5mm Delicate heart circle 3D Rhinestones.


You can get a 10% on ALL items from the born pretty store when you use the coupon code 'DRX31'
So you may notice these are slightly similar to the wheel I showed you earlier this week, with the exception that these are all darker rainbow gems. These gems are also made from acrylic resin.They come in a wheel containing 200 pieces and come in heart, circle and tear shapes. They are absolutely mesmerising to wear, literally catching colour and changing in every light and from every angle I move my hand. I can guarantee you will not be able to take your eyes off of your nails if you wear these. I decided to use only the circles today to create a chandelier sort of effect. I sealed them with OPI's top coat and they are held firmly in place.

For this manicure: I decided to go with a light base to hopefully let all those beautiful colours on the gems jump out and speak for themselves. I started with two coats of Picture Polish 'Wisteria' and created a gradient by adding HD Nails '#3' (The Blue). I topped that off by applying two coats of Sinful Color's 'Hottie' which is a beautiful subtle glitter. Finally I created some lines with black acrylic and added the gems on top, adding a little of Color Club's 'Harp On It' with my smallest dotting tool.

What do you think of this manicure? Which of the Born Pretty gems I've shown do you prefer, the lighter or dark ones?

Have a magical, glittery weekend!
Love
Ithi
SHARE:

Rainbow Chevron Nails With MoYouNail's Newly Stocked Plates

*This item was sent to me to review but as always will contain my full and honest opinion :)

Allo polish Pals!
How are you today? I hope you've been having a good week. How is your weather? Here in Holland its a beautiful sunny day, it lovely to sit and type with the door wide open and lots of sunlight filling the room. Did you know that MoYouNails have a whole new range of stamping plates in stock? When I was contacted to try out a few of the new plates I was of course so excited and even more excited when I saw the 128 stamping plate because I've wanted to wear a chevron/zigzag design since forever. This is a full design plate. Come take a look and please excuse my slightly blue finger...
A shot of the beautiful 128 stamping plate and... Argh, Blue index finger!

All the designs on this plate are gorgeous and I am looking forward to trying them out really soon; I'll also have another two plates to show you in the near future. I am really looking forward to trying the mermaid scale pattern and the diagonal lines which remind me of sun rays. I highly recommend you take a look at MoYouNails if you have not yet done so. They carry a wide selection of high quality stamping plates, polishes and many sets and accessories.


For this manicure I decided to create a horizontal rainbow gradient and used the following colours, from thumb to pinkie: Catrice's 'Lime Heart Beating Like A Drum', Yes Love's '007', Rimmel's 'Blue Eyed Girl' (The blue stained finger culprit) Picture Polishes 'Wisteria', Yes Love's 'N025' and Barry M's 'Peach Melba'. I then decided to use this plate by making decals using Fogan's '#08' to stamp and Collistar's '#37' for some rainbow glitter pizazz!

I am so happy to finally have chevron nails and I am happy with how the rainbow looks with the stamping decal. I just wish I didn't photograph my blue-d up finger and my cuticles were a little neater but oh well!

So what do you think of this manicure? Have you tried MoYouNails stamping plates yet?
Have a great day!
Love
Ithi
SHARE:

The 31 Day Challenge: Day 2 - Orange

Allo polish Pals!
How are you doing? Have you been lucky enough to have beautiful weather so far this week? I can't believe how hot it is here in Holland and it's not even summer! While I love beautiful warm weather I've already had a few run-ins with mosquito's! Today I am showing you day 2 of the 31 day nail art challenge which requires orange nails! Get ready to be tango'ed.

Today's pictures are a little different from normal, since my camera absolutely hates photographing orange I decided to take my pictures outside. I'm glad I did!
The Manicure...On my thumb, index and pinky I began by applying two coats of Catrice's 'C(h)ome, Leon!' and created a gradient by adding Catrice's 'Orange Bloom' to the tips. I finished these nails off by adding a bright neon candy stud from The Born Pretty Store. On my remaining fingers I used two coats of Rimmel's 'Reggae Splash', applied 'Orange Bloom' in a wavy style using the brush and added some bright neon dots using Picture Polishes 'Fake Tan'. I again finished these by applying a couple of the light peach candy studs.

What do you guys think? Are you a fan of orange nails?
Enjoy the rest of your day!
Love
Ithi
SHARE:

N.Nail Warm Pink, Light Orange Nail Foil Review

*This item was sent to me to review but as always will contain my full and honest opinion. :)

Allo polish Pals!
Have you had a good day? I've had quite a productive day with lots of tidying and organizing so I'm quite glad Mr Bravo is home tonight, I'll have a glass of well deserved wine and maybe we'll watch a movie – a horror sounds good! Today I have another one of the foil's from KkCENTERHK to show you. Remember I've shown two already? You can see those here and here. Today's foil is N.Nail's warm pink, light orange nail foil. I have a lot of reviews coming up soon and I am super excited to share them with you in the next week or so!

My application wasn't so good today, I blame tiredness!
So shiny!
Since I am mainly showing you this foil I decided to opt for an easy manicure. I used two coats of Picture Polishes 'Water Melon' on all my nails and applied only one full nail of foil (I'm realy tired :( ) On the other nails I painted my beauty glue diagonally so I have a funky foiled French tip!

I really enjoy using the N.Nail foil's, I always think they add such a pretty effect to any manicure, it doesn't always mean that you have to wear them on the entire nail. Last time I applied these foil's I felt really proud of myself, I managed to apply it without any wrinkles but today I wasn't so lucky (That's just me) I absolutely love the colours that shine through out this foil, There's a rose pink, gold and what looks like a pure white gold. Don't you think it looks pretty? I think this may be my second favorite of the foil's I tried. If you applied this over a very light pink and had mostly the light gold and soft pink colours I bet it would look very delicate!

Don't forget you can get a 10% discount on all items from KKCENTERHK when you use the code 'ithinitybeauty' – arn't they kind? What do you think of this foil? How do you find applying foil to be?

Have a lovely evening!
Love
Ithi

SHARE:

Frightfully Bright

Allo polish Pals!
How are you doing, did you have a good weekend? My weekend plans were cancelled since I was so poorly last week but I'm glad we will be going to the zoo next Sunday! Today I'm taking it easy with lots of Green tea, Farmville 2, a small trip to the mini mall and the season finale of The Walking Dead with Mr Bravo, do any of you guys watch that show? Last night I created an incredibly bright manicure and I was so excited to show you today. All I can say is... If I was to recreate it now I'd do a lot differently, but I'll show you anyway. Please excuse the messy cuticles (cry) it was so hard to clean this up with the rubbish nail polish remover I am now using (Love, love, love Cutex but can't find it here in Holland)

On all my nails I started with two coats of Barry M's 'Peach Melba' and created a gradient using Model's Own 'Sophie's Pink', Picture Polish 'Wisteria' and Barry M's 'Guava' on the tips. I then used striping tape to create a 'sun ray' sort of design and applied Barry M's textured polish 'Station Road'.
What I would do differently next time: I would make the tape design more abstract like the thumb nail, I think that design looks better. I would also have hoped for a better clean up for a better end result.

What do you think of this manicure? Do you like textured polish paired with this gradient?
Hope you have beautiful day!
Love
Ithi
SHARE:

Happy Purple Day - Ithi's Fabulous Five Purple Picks

Allo polish Pals!
How are you today? Happy Purple Day! Yes it actually is purple day today, did you know that? I just love purple so I decided to make today's post a little different. I'm going to show you my 'fabulous five purple picks'. Purple day is actually a day to raise awareness for epilepsy and was founded by nine year old Cassidy Megan in 2008, isn't that amazing? I have to tell you that looking through my collection of purple polishes and picking only 5 was not the easiest task in the world but here's my purple loves that I'd recommend to you!

From L to R: Color Club: 'Eternal Beauty', Barry M: 'Prickly Pear',  Models Own: 'Purple Passion', Hema: 'Chameleon Cobalt' and Picture Polish 'Wisteria'.


Thumb: This is Color Club's stunning purple based holographic polish 'Eternal Beauty'. You can see my past review here: Ever since I saw a swatch of this polish I just had to have it and I was by no means disappointed! I still get glassy eyes of wonder whenever I am wearing it, I just can't stop admiring its beauty.
Index: The gorgeous and subtle 'Prickly Pear' from Barry M. You've probably seen this one pop up in my nail art from time to time, it works so beautifully with all sorts of colours. I'll be adding a review soon.

Middle: This is Model's Own's 'Purple Passion'. It was one of the first MO polishes I ever purchased and even now I love it no just because of its colour but its vinyl-like finish. I reviewed this one quite some time ago here. Sadly I believe it is discontinued now.


Ring-ding Finger: This rich indulgent duo chrome is from the Hema, 'chameleon cobalt'. This is a pretty indigo which shifts delicately from blue to purple shades. It's just silky, smooth and packs a wicked shine.

Pinky: The lovely and delicate 'Wistera' from Picture Polish, a wonderful bright purple crème. I have already reviewed this one Here

Whats your all time favorite purple polishes? Is there a polish in my top five that grabs your fancy?

Play in purple and have a great day,
Love
Ithi
SHARE:

Picture Polish: Jade Swatch & Review ★★★★★/5

Allo polish Pals!
How are you? Are you having a good week going so far? This weekend turned out to be a bit of a disappointment for me, instead of going out as planned I spent most of it in bed resting. I've not been too lucky with my stomach condition lately but once again I'm feeling better (and taking extra care of myself!) and looking forward to going to see mine and Mr Bravo's brother and sister-in-law this afternoon, should be fun! :) Today I have a review of Picture Polishes 'Jade' for you - “Love and harmony, seek your fortune!” 

 Colour ~ Jade is a beautiful medium spring green with a subtle hint of silver running through it. Despite how subtle the shimmer is there is just the right amount to still be noticeable ~ Can't you see how it gives the green a lovely smooth sheen to its appearance? Jade always reminds me of spring time, flowers and frogs!

Application ~ I have no trouble with the application of Jade and what you see here is a smooth two coats. Although applying my first coat I thought it looked a little streaky the second coat really smoothed it out and I feel like Jade has a wonderful self levelling property to it which is always awesome!

Texture ~ I think I'd call this a crème... I find the texture to be on a slightly thicker side but that gives it no problems at all, once dried it looks incredibly smooth/satiny – I love that.

★★★★★/5 ....A full five stars!  I love this polish from pIcture pOlish, there's really no bad words to say about it. The only look out point would be to allow drying time between each coat and paint thinly. That said, I had no issues and I just adore this colour. I think if your collection lacks a shade like this then its a great addition! Don't you think it's perfect for spring?

What do you think of Jade? Are you a fan of green polishes?

Have a beautiful day!
Love
Ithi
SHARE:
Blogger Template Created by pipdig