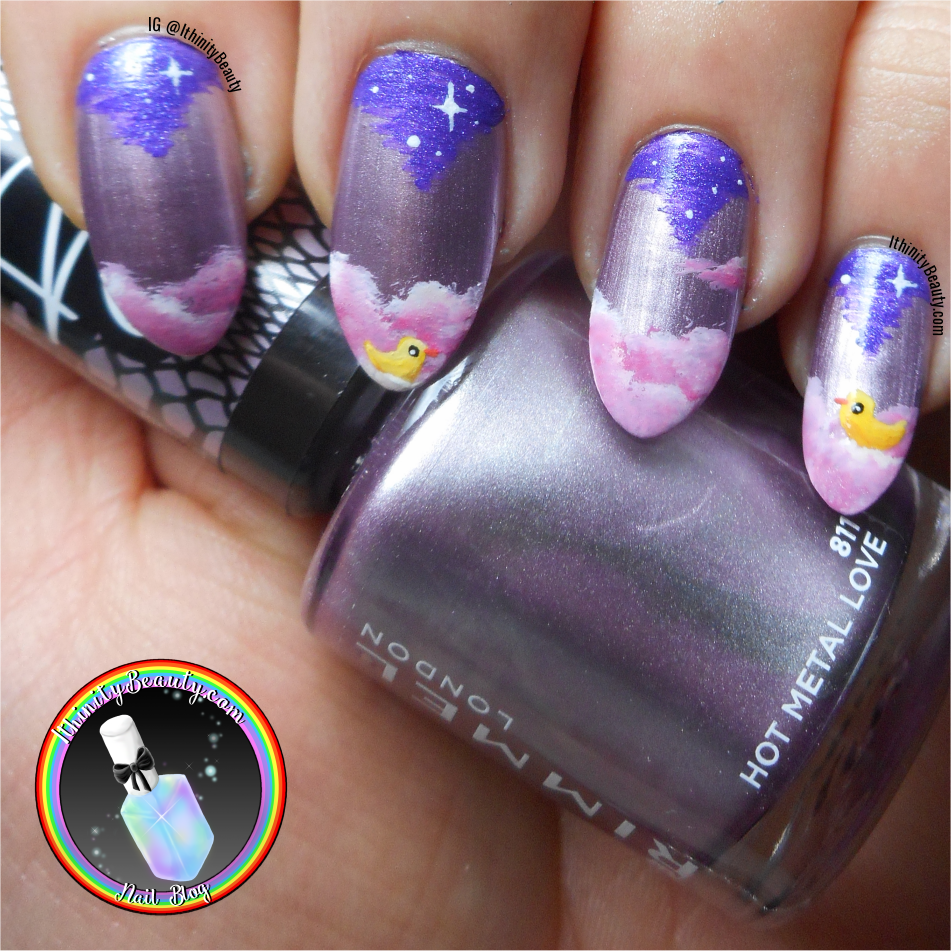
Clouds and Ducks - Abstract Sky

Allo polish Pals!

How're you all doing today, I hope things are going well for you all? I'm just in my bubble, fending off my cold and looking for work – there still seems to be little going and I know there are talks that a lot of the high street shops are struggling. Until then I continue to paint and keep my spirits up! 

Also these pictures are still with the old camera, I've been having fun with the new one, getting to learn it and I've changed my dark background.. In terms of picture quality improving I'm really not sure but they certainly don't seem to be worse which is good!

Today's nail art features a nail polish I was given by my mum and Christmas. If I am entirely honest I had no nail ideas for this shade but I wanted to use it so badly that I ended up creating something rather weird. I can't say I am 100% happy with this manicure but painting is always fun.


SHARE:

Freehand Kawaii Cherry Pie & Half Moon Nail Art

Allo polish Pals!

How are you all doing today? I hope you had a faaaaantastic weekend. Our was quiet but delightful – I'm waking up everyday at 6.30am, happy, content and ready to go. I'm still pretty OCD with my lists but I feel like its not ruling my life any more, it's more that I am ruling the lists and ticking things off with a sense of accomplishment at the end of the day.

Anyway! Today's nail art must have been done just after my last visit home.. so sometime in April! This isn't the last one from April either but I had to keep pushing these posts back for reviews and such.

Here's my cherry pie nail art! 


SHARE:

Freehand Disney's 'Lumpy' The Heffalump Nail Art

Allo polish Pals!
How are you all doing today? I hope you had a fantastic weekend? Did you get up to anything fun?
Me and my sister took the children to a big play park that looks like a pirate ship on Saturday, the weather has been beautiful - it feels like summer is already here! Sunday was pretty dandy too, I got to have one of my Skeebab's (Mum) roast dinner followed by a nice walk in the sunshine and later on I did some painting.

Today's nail art is another manicure inspired by another weekly challenge over at Tiny Canvas! This week our theme is elephants since April 16th is 'Save the elephants day' and rightly so! These beautiful creatures have enough to endure without poachers and hunters.

For this manicure I decided to honour one of my most favourite elephants, Lumpy the Heffalump from Winnie The Pooh. I included a clip in case you've never seen Lumpy before, he is AH-dorable!


The polishes I used for this manicure are Barry M's 'Kiss Me Quick' from the quick dry range 'and Rimmel's 'Peachella'. I wasn't really sure what to pair with my Heffalump so I created some sort of scruffy looking flowers.. er. I finished it all off with my Barry M Matte top coat.

If you guys are noticing my pictures may be looking a little different to usual I do apologise. I've just been gifted a new DLSR and I have little to no experience with this type of camera – I'm also still in England so I don't have my usual photography set up. I am excited to try the camera with my set up at home!

Do you have a favourite elephant character? What do you think of my Heffalump nail art?

Don't forget to enter my international giveaway if you haven't yet!

Have a beautiful day, my friends. Thank you for visiting today. I will be back on Wednesday for some more nail art fun!

Love
Ithi
SHARE:

Mardi Gras Twin Mani with @Jodies_Nailz

Allo polish Pals,
How are you doing today? I hope you had a fab weekend, did you do anything exciting?

I just thought I'd let you know also that from now on I'll be posting Monday's, Wednesday's and Saturday's. I've always been pretty organised with my blog but posting every other day felt a bit too fast sometimes. Creating nail art and posting it, I was keeping up fine but I couldn't really get ahead of myself as much as I'd like.

Did you know that tomorrow is Mardi Gras? According to Google its also called Shrove Tuesday – Which is what I and my fellow English call it, although Mardi Gras translates to 'Fat Tuesday' in French (Yes, I always try and do my homework on time!) The 'Fat Tuesday' references the last night celebrations of eating richer and fattier foods before the ritual fasting of the Lent season. It is mostly celebrated all around the world in different ways.

Also in this post I'd love to introduce you to my dear friend, Jodie. She's an absolutely lovely lady and it was her idea to get together for our second twin manicure for Mardi Gras. Please go and check out her IG @Jodies_Nailz – She's a seriously skilled stamper with kickass manicures!


SHARE:

Shining Nail Glitter Powder Nail Art Decoration - Born Pretty Store Review

*This post contains an item(s) that were provided for reviewing purposes however I will as always give my full, honest and unbiased opinion.

Allo polish Pals!

How are you all doing today? I hope you had a sweet weekend! Did you get upto anything fun?
Saturday was awesome, I had a really nice girly day out with my sister-in-law (I call her that even though Mr Bravo and I are not married) I am so glad we are close and get a long so well, it was nice spending time with her away from home! :) I've started the countdown now.. Friday night I will be flying home!

Today I have another product from The Born Pretty Store to share with you. This is 'Shinning Nail Glitter Powder Gorgeous Nail Sequins Manicure Nail ArtDecoration' – Now I am sure that title could have been shortened! I am wearing shade #378.


When I saw this glitter in the store I was instantly interested. Loose glitter isn't something I consider myself to be well experienced with but I'm always game to try new things! The colour is of the glitter is mostly purple with very fine glitters and also larger different coloured pieces. I would say it is not too similar to what I thought I had selected in the store which looked like a soft muted mauve/lilac glitter where as this is clearly a much more deeper purple shade. I still like it though.


Click to englarge.

The store suggests that you should wear this glitter by applying a clear top coat and adding the glitter on top which is exactly what I did because I wanted some serious bling. I would say it was pretty easy to do but of course slightly on the messy side. I also refused to use either of my fave top coats on top because I did not want glitter contaminating it so I used an older less important top coat to seal all the glitter in. For my base for the glitter I used Rimmel's 'Midnight Rendezvous'.

 I quite like the look of the glitter but I was expecting more... twinkle. Would I recommend this to a friend? If she is incredibly partial to glitter than of course, I think there are much more interesting ways you could wear these glitters than the way I have. An example? Stencil/vinyl designs could look really cool paired with these.


What do you think of this glitter manicure? Do you like loose glitters like this?

Thank you for visiting!
Have a beautiful day, my friends! I'll catch you again on Wednesday for some more nail art fun!

Love
Ithi
SHARE:

Rimmel: Chin Up Buttercup Swatch & Review ★★★★/5

Allo polish Pals!
How are you all doing today? I hope you are doing great!
I don't know about where you are but the weather this week in my part of Holland has been so gloomy that I thought I'd give us a little dose of sunshine, you guys up for that?

Here is Rimmel's 'Chin Up Buttercup' – could this shade be any cheerier?


Colour ~ Chin Up Buttercup is a beautiful strong creamy lemon shade, its far from being on the pastel level but isn't quite a neon but it does deliver a beautiful pop of colour!

Application ~ I didn't really have any issues with this polish but I did opt for a third coat just for full opacity. Compared to some yellow polishes it didn't streak too much and I was quite happy with the self levelling end result.

Texture ~ I find this one really hard to describe, I'd on the thicker side and feel somewhat like a jelly polish without too much of the jelly finish.

★★★★/5 Considering my yellow collection is quite small it certainly fits in rather nicely. I've got neons, I've got pastels, this just seems to fit in nicely between the category. Would I recommend this to a friend? Yes if she is looking to expand her yellow nail polish collection on a budget.

What do you guys think of this yellow and how has your weather been so far this week? Do you to wear colours that go against the weather/seasons?

Have a beautiful day my friends, I'll catch you again on Saturday!
Love
Ithi
SHARE:

Freehand Girly Hearts And Bows

Allo polish Pals!
Happy weekend to you all! I hope you are all doing great and have some fun things to look forward to this weekend? I'm planning some nice quiet painting time this weekend (this week has been really slow on the nail art front.)

Lastnight Mr Bravo took me out to dinner, a Greek restaurant! The food was so good! But not only that..it all was all just lovely! With my eye looking almost back to normal (there are eyelashes still going through and I shampoo them multiple times a day) I wore make up for the first time in forever! We don't get to do things like this too often..so it was wonderful :)

Today's nail art is really random and was painted while I was in England. I also apologise I don't really remember what I used.. what a fail. This is why I normally jot things down in scheduled posts before they go live because my memory is the worst! 


I really can't remember what I used.. I have a feeling that the blue is Rimmel's 'Pillow Talk and 'Neon Fest' but I might be wrong... Oppsie. Oh but looks like I used Catrice's 'Matte & More' - yay for bottle shots for the forgetful!

I was incredibly low on time so I wanted to create something fun and fast, I tried to create gradient hearts with my acrylic paints and opted for a bright accent nail with a freehand bow.

I feel a little guilty because normally I can at least describe my actions little better but hey...July feels like 900 years ago. I'm getting old, ok?! I got a case of goldfish brain going on!

Also guys, if you have any suggestions of anything you'd like to see on my nails don't hesitate to leave it in a comment. If I can do it, or it inspires me I'll certainly try :)

What do you think of this nail art? Does it make you think of little girl party dresses?!

Have a wonderful weekend my naily friends, Can't wait to catch you again on Monday!
Love
Ithi
SHARE:

Freehand Cherries and A Fresh Water Colour Background.

Allo polish Pals!
How are you all doing today? I hope you are having a fabulous Thursday! INFO


Today I have a website to share with you that was created quite some time ago. I was really unhappy with it and eventually did another version which I was then equally as unhappy with! So I'm showing you the original. Maybe its not as bad as I think, I don't know.

For this manicure I began with my OPI 'Nail Envy' and added two coats of Rimmel's 'White Love' (Not my preference at all!) Next I added a coat of Pro-FX top coat as a nice barrier and moved onto my acrylics. I wanted to create a sort of fresh and happy looking water colour effect in the backgroun and on top of that added a pair of cherries to my nails. I sealed this all in with another layer of Pro-FX top coat and finished with Catrice's ' Matt & More' to give it a subtle pinky tint and matte sheen.

In my head I still want to completely redo this manicure. I wanted a cute retro and vintage feel which I just didn't achieve. Perhaps a red accent with polka dots might have hit the spot... We'll find out one day!

If you liked this post please be kind enough to share using the share buttons below.
Have a wonderful end to your week, I'll be back on Saturday for some more nail art fun!

Love
Ithi
SHARE:

The Noisy Noisy Farm - Freehand Nail Art Inspired By.. A Children's Book.

Allo polish Pals!
How are you all doing? I hope your week is off to a great start!

Today's manicure was created while I was visiting back home in England.

Everyone was either at work or in school/nursery and my inspiration was lacking. UNTIL...!

I wandered into the living room and saw one of the books my mum has there for my Niece/Nephew. I decided it would be so fun to try and paint a page so I could show my 5 year old niece when she got home from school. The book is one of those noisy ones with the audio buttons, I better just state it was written by Stephanie Stansbie and illustrated by Veronica Vasylenko.


My kitties face is a bit deranged.

For this manicure I began with my OPI 'Nail Envy' (I hadn't tried Mezmris at this point) and once dry applied two coats of Rimmel's 'White Love' (Also hadn't stocked up on Barry M) I then added a coat of Pro-FX because... polish to paint barrier. I don't know why I do it. I then used my favorite brushes and acrylic paints to freehand the scene from both pages of the book. I sealed it all in with another


My niece was really impressed when she saw them but didn't remember where it had come from (It's been a while since she read this book as its always been there) so when I reminded her and showed her the page I'd copied she was really shocked!

What do you guys think? Have you done nail art inspired by illustration before? It was hard to fit some things in at certain places, like the cat should have been full on the fence but there just wasn't room!

If you liked this nail art please be a puddingpop and share this post by using one of the buttons below.

Have a fabulous day, I'll catch you again on Thursday (By the way, did you know Thursday is 'Burger day' – how odd! )

Love
Ithi
SHARE:

Starry Streamers And Confetti! - Freehand Nail Art

Allo polish Pals!

How are you all doing today? It's going to be really busy here! I've got things booked up in my calander (I really prefer to be busy than bored!) and because my sister has her holiday here in Holland this year Mr Bravo will be going to visit her and her family!! I am so excited, I will get to see my niece and nephew again!

Calm down, Ithi... Today's manicure was created while I was in England. I had a few spare hours while everyone was at work/school/nursery and I had intended to do some serious painting which didn't really turn into anything... Undefeated I came up with this design!

I've also tried to film it so I could create a tutorial but you can see nothing of much help in the video. Back to the drawing board – I think I just need to figure out a set up that works for me. We'll get there!


For this manicure I began with my usual base coat of OPI's 'Nail Envy' and once dry I moved onto my polishes, Barry M's 'Surfboard' from the coconut infusion collection and Rimmel's 'Pillow Talk' to my middle and ring finger. I applied two coats and added a smothering of my Pro-fx top coat. Next I took my acrylic sketchy unruly lines using a liner brush. I repeated this process using various shades of bright colour. I then took my detailing brush (its actually the same brush but on the other end!) and began to create some little stars with white acrylic. I also added some dots here and then. I finished it all of by sealing it in with a final layer of Pro-FX 'complete' top coat.

What do you think of this manicure? Would you guys want to see a video of how I did this?

Thanks for dropping by, if you liked this nail art please give it a share using the buttons below.
I'll be back on Saturday with some more nail are fun. I hope you have a beautiful day!

Love,
Ithi
SHARE:

The Butterfly Fairy - Freehand Nail Art

Allo polish Pals,
How are you all doing? I hope you had a wonderful weekend! Don't forget to enter my giveaway, I've opened it internationally so you can all join in! Cos... I love my naily friends :)

My weekend was pretty crazy. The sun has been out in my part of England and we've been rather busy. On Saturday I went with my Sister, Niece and Nephew to their school fete. The kids seemed to really enjoy it. They had their faces painted and had some yummy cakes. On Sunday everyone came over for Sunday roast dinner (OMG. I missed my mums cooking. The potatoes were picked from the garden that very morning!) followed by a game of minion bowling and a nice stroll in the countryside to walk off lunch...Ah. I love English Sunday afternoons!

Anyway, shall we see some nails? I'm not entirely sure about these. Tiny Canvas's weekly challenge this week was fairies and I really wanted to take part. I did a fairy last year and I really wanted to do better than that with this one. My last fairy was a button headed beady eyed weirdo :) I think I've improved a lot but I'm really bummed that I didn't position my fingers right to get her wings/legs to line up.
I also globbied up her left eye... I should stop pointing these things out, eh?


SHARE:

Nicole Diary Water Decal Review - Pt. 2

*This post contains an item(s) that was provided for reviewing purposes however I will as always give my full and honest opinion. 
Allo polish Pals!
How are you all doing today? I hope you are having a great week so far. I have been exploring Holland on Doris, I managed to get to the first subway station after the one at the mini mall! Its so weird riding on the opposite side of the road so I am sticking to the bicycle paths, the real road scared me a little, ha!

Today I have two more water decals to share with you from Nicole Diary. In case you missed my first review you can see it *Here*. So far its been nothing but a lovely experience, I am really enjoying how unique these water decals are and the ease of application.

I'd also like to mention that Nicole Diary have very kindly offered readers of IthinityBeauty a free gift worth up to $5 when you order from their Amazon/Aliexpress store and add the code 'ITH2016' to your order note - Isn't that super nice of them?!

This first design can be found: Here.

This first design is a beautiful combination of full pattern and sheer areas (in between the pattern) for this reason I decided to pair it with a beautiful silver holographic glitter underneath. Can you see the sparkle popping through the pattern and even under the decal colours? The colours on this decal are green, red and black and work beautifully together. I kind of get a Native American/Dream weaver feeling from them, don't you? I could be wrong. This manicure got me so many compliments!


This design can be found: Here.

The next set of decals are much more simpler if heavy patterns are not your thing. I think there's something really soft an feminine about this doodled/silhouette pattern. I feel like it would be well suited to some kind of soft furnishing! To keep the elegant and feminine look I decided to keep this manicure very light. I created a gradient using Rimmel's 'Breakfast In Bed' and Essence's 'A Girl With A Pearl' with a single accent of Essie's 'Beyond Cozy'. I finished by adding my decals and a single light green stud (Should have gone more pastel) and applied my Pro-FX topcoat.

I absolutely love both designs. You guys know me, I'm not shy of a full patterned nail! I also like that I can sneak glitters underneath for a little sparkle-pop! I think they would both be great for different occasions or as accent nails if you like a simpler but still super pretty manicure. I'm eyeing up the first one for big toe nail accents!

What do you think of these designs – which one do you prefer? Would you like to see how I apply my water decals in a video tutorial?

Have a beautiful day my friends, I'll catch you on Saturday!
Love
Ithi
SHARE:

DIY Dry Marbled Pastel Decals

Allo polish Pals!
How are you doing today? I hope you are doing great! Do you have any goals set for this week? I think I am going to start setting myself goals...

I currently have have no internet besides cheekily hopping on to Mr Bravo's 4G here and there (obviously sparingly, Don't want to wrack up a huge phone bill) so I wont be able to comment and stuff until Tuesday (Hopefully the tech can fix it!)
Today I have some more DIY decals. I really enjoyed these nails because it was an easy way to get the water marble look without the failure risk. Its a more guaranteed way of getting marbled nails!


For this manicure I began by using some clear polish on a piece of old flooring (I'm not fancy enough for one of those special mats.. but hey if it works!) I allowed that to dry and painted my first base colour alternately. The polishes I used were Rimmel's 'Peachella' and 'Wild-er-ness', Model's Own 'Blueberry Muffin' and 'Banana Split', Essie's 'Mint Candy Apple' and China Glaze's 'Something Sweet'. I used a tooth pick to marble all these beautiful pastels together and set a side over night to dry.

The next day I painted on my favorite base coat, OPI's 'Nail Envy' to my clean nails and carefully peeled off my decals using pointed tweezers. I lay them onto the nail and gently patted them to get them to stick to my nails (They sort of warm up and stick to the base coat) I cleaned off any excess and took it one step further by adding a white border with acrylic paint and some simple gold sequin studs.

What do you think of my non water marble..marble? Have you tried making your own decals?
I'll keep you posted about my internet situation but luckily enough I have posts hanging around :)

Have a lovely day!
Love
Ithi
SHARE:

Dry Brush Hearts & Kisses Nail Art

Allo polish Pals!
How are you doing today? I have a manicure I created almost by accident.
I was having a really bad nail day, nothing was going right for me at all. Just when I almost gave up I decided to just throw some colours around. I'd never done the dry brush technique before but it seemed as good'a time as any to try it out!
For this manicure I began with two coats of Barry M's 'Persian' and once dry began dab/drag my dry polish brushes across it using China Glaze's 'Fly' and 'Pink-ie Promise' and Rimmel's 'Neon Fest'. So colour wise I was thinking it would make a kinda cute and edgey Valentines themed manicure so I cracked out my acrylic paints and added a border and some hearts and kisses!


I really enjoyed using the dry brush technique. I'll certainly be revisiting it in the future!

What do you think of my dry brush manicure? Have you tried this type of nail art before?

Have a super day!
Love
Ithi
SHARE:

Through The Keyhole - Freehand Wood and Swan Nail Art

Allo polish Pals!

How are you doing today? Today Mr Bravo and I will head back to Holland. I always hate saying goodbye to my family at the airport...It somehow never gets much easier. But I had a wonderful time at home. Now its time to go back and get serious with my goals.

Anyway, Today I have some nail art I was really proud of.. until I have to come to a really tricky dilemma. Do I used the top coat I normally use for my acrylic designs even though it was almost out and on the sticky side... or use the new Barry M one that seemed to darken all my acrylic paint...?

Sadly I went for the first option and this piece came riddled with micro bubbles... I was really pleased with it before I saw the pictures! I'm still going to share it with you because I like the concept and colours.


For this manicure I really only used one nail polish which you can not even see. I used my regular 'Nail Envy' base coat from OPI and once dry applied two coats of Rimmels 'Rain Rain, Go Away' which... seems really random now but my white is kinda depleted (Why does everything run out all at the same time? - does that happen to you?) I created everything else with acrylic paint.

I wanted this to look like you could be looking through a keyhole into a beautiful fantasy land with a gorgeous sunset and a calming swan lake.

What is your go to base coat, do you use it with acrylics?
What do you think of this nail art design? Would you want to go through that door?

Have a beautiful day!
Love
Ithi
SHARE:

Freehand Fluff Monster (With Flocking)

Allo polish Pals!

How are you doing today? I hope your week is going well. I can't believe my four week long trip back home to England is almost over, we fly back on Sunday.

Just a reminder guys, don't forget to join my blogger brick wall. It means you can have a little screenshot of your blog with a link to it. You are all welcome to join. Lets make this a mega huge blogger brick wall :D 

Today's nail art was actually an idea from... god know how long ago. I was lucky enough to win a nail art contest from Minnie at Nail Bee's blog a while ago, there where quite a few different coloured fluffy flocking powders and I had been dying to use them ever since I got them but I just couldn't think what to fluffify. I tried teddy bears and I just wasn't happy with the out come (on my part)... then this guy came along. I call him... Sir Chomps-A-Lot.

I used only two polishes for this manicure, Rimmel's  'Peachella' and 'Wild-er-ness'. I decided to do a mixture of things for this manicure, a gradient and some blobbicure-ness. I created Sir Chomps-A-Lot with acrylic paint and once dry decided to test out the orange flocking powder. I think it actually suits him. I could have perhaps built it up a little more in places..

Unfortunately by the time I'd finished with my flocking powder my blobbicures had bubbled spectacularly. Oh well..

Do you prefer Sir Chomps-a-lot naked or with his orange fur suit? Are you a fan of blobbicures?

Have a great day!
Love
Ithi
SHARE:
Blogger Template Created by pipdig